Posts

Showing posts from February, 2025

Attaching the foam strips to layers-Castle brief

Foam strips and problem solving Below is the process of attaching foam strips and stacking the layers up. Now that I’ve had my first proper look at how my piece is coming together, I do wish I had used a more powerful light source—so far, I’ve only installed a 5-metre strip light. Initially, I didn’t take into account how many layers of card the light would need to travel through, especially since most of the examples I came across in my research used no more than 15 layers, often fewer. That said, I still believe my piece has a strong presence and communicates the message effectively. This is simply my critical mind reflecting on things I hadn’t fully considered during the early stages.

Making the last two layers for the sky and sea-Castle brief

  Process of the sky and sea layer This video captures the process of creating the final two layers, using tissue paper in rich shades of blue, purple, orange, and yellow. The front layer is made from newsprint, which is more transparent than the card used in the earlier layers, allowing the colours beneath to shine through with a soft, diffused effect. I used tracing paper for the moon, giving it a subtle glow that gently brings the scene to life. The concept of layering adds depth, which naturally creates a play of shadows and light that subtly shift as the layers recede. I find this effect to be quite magical. The idea of incorporating colour came to me during a conversation with my tutor. He mentioned taking a silhouette photo of his house, but what made it truly captivating was the soft yellow glow from a bedroom light, which beautifully complemented the deep blue of the night sky. This sparked my inspiration to introduce a pop of colour.

Process of the laser cutting and artist research-Castle brief

Process of laser cutting This link showcases my  process of laser cutting  35 layers.  I still have two final layers to complete—the sky and sea—which I plan to add colour to and a newsprint paper layer which will diffuse and soften the coloured tissue paper. I’ve also explored the work of various artists who create paper cut-out light boxes. One artist I’ve been following goes by the social media name  Light Box Life . In one of her videos, she discusses experimenting with different light box colour settings, but found that keeping the light box on a white setting and using coloured tissue paper creates striking pops of colour in specific areas. I’m going to create the background next using a selection of sunset colours. I believe this will draw the viewer’s eye in more and also add a sense of excitement, as it’s not just limited to light and shadow tones.

Artist research Jeni Cairns-Castle brief

Image
  Artist research Jeni Cairns  I came  Jeni Cairns who is an award-winning artist and garden designer based in rural Cambridgeshire. Cairns is known for her metal sculptures and intricate filigree metal panels that depict the beauty and fragility of nature. She often utilises reclaimed materials in her work, like metal oil drums, creating pieces that exhibit both delicacy and strength. What I really like about the layering in Cairns’ Song Thrush' piece is how it gives the artwork a sense of depth and life. Instead of just being a flat image, the layers make it feel more like the bird is sitting within its environment—almost like it's part of a little hidden world which is what I am trying to capture with my own piece. The way she cuts and arranges the metal means that when light shines through it, it casts beautiful, detailed shadows. These shadows change depending on where the light is coming from, which adds a magical, ever-changing quality to the piece. It’s almost...

New layers on PhotoShop-Castle brief

Image
  Several layers ready to be laser cut Below are some examples of my layers that are ready to be laser cut. I am so happy that I have managed to complete them as even though I enjoyed adding new and intricate detail to some layers, I also felt the strain of how long this was taking whilst still juggling other projects. I look forward to seeing all the layers cut out and I hope that the layers line up together. I will be putting a 20mm border around the outside of each layer to give it structure and integrity. Everything that is black in the background will be cut out. Everything that is white will be attached to the border. Above is an A4 and A3 test piece of the new sketches. I did this to check the borders worked and were in proportion.

Problem solving, correcting mistakes on PhotoShop- Castle brief

Not giving up Below is an annotated video explaining my process of having to redo all the layers again, correcting mistakes I made. Redoing the layers taught me a valuable lesson: never give up. At first, I was frustrated with myself because it felt like a setback. But once I started again, I realised that redrawing the sketches allowed me to add even more detail, making them better than before.

Using ProCreate to trace- Castle brief

Image
  Using Pro Create to trace I have created 15 layers on acetate that I have scanned and emailed to myself so I can work on them in Pro Create. I have used Pro Create before but it was quite a while ago and I am not familiar with it so I had to watch a few videos on YouTube. Below are some before and after photos out of the 15 layers I created. They show how I tidied up the line drawings by lowering the opacity of the original drawing, then tracing over it on a new layer. Looking at the finished tracing, I may have to make the lines thinner somehow as they might be to thick when going through the Trotec software that's used for laser cutting. I had this issue with the lines being too thick with the test pieces.

Creating layers- Castle brief

Creating layers on acetate Below is a annotated video of me creating layers. I found using a Sharpie fine liner was the best pen to use as all the others smudged.  I once finished, I plan to scan to email all drawings so I can tidy them up on photoshop.

Sketching my landscape scene

Sketching my landscape scene Below is a annotated video of me sketching a layout and problem solving.  

Starting the landscape- Castle brief

Image
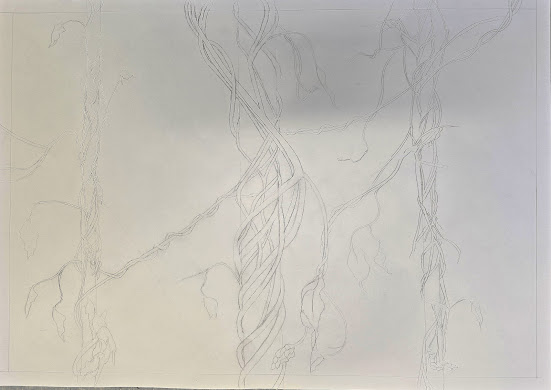
  Sketching I plan for this sketch of the vines to be my top layer. I was going to leave the railings in that the vines were wrapped around, however I like the idea of the viewer to also be able to see through the negative space of the vines. This adds to that feel of trying to look around something or being nosey, peaking over the fence. I will be using the laser cutter like I did with the proto type. I am looking forward to seeing this layer being cut by the laser cutter as there is alot of intricate detail. Even though cutting each layer out by hand is a timely process. With the space that is removed reveals where you will sketch your next layer and so on. I wont be laser cutting one at a time so I now need to work out how I am going to build the scene layer by layer. I think I will try using acetate to sketch on as its clear.

Ideas- Castle brief

Image
My wall space Below are some photos of my children from several adventures that I have put up in my space.  I have created an audio video to explain what  my landscape piece is about The landscape photos above are from different journeys we have been on. Both in the UK and abroad. I like them for different reasons that I have noted on them.

Making my own lightbox- Castle brief

Image
I am making a lightbox for my cut out layers. It will be A2 size and I will fit lighting inside that has multiple colour to change the mood effect. I have white perspex instead of clear that will soften the lighting.   The above photo is of the side panels that I will attach together with the staple machine In the audio video below I go through my process of making the light box. Getting ready to attach the base.